
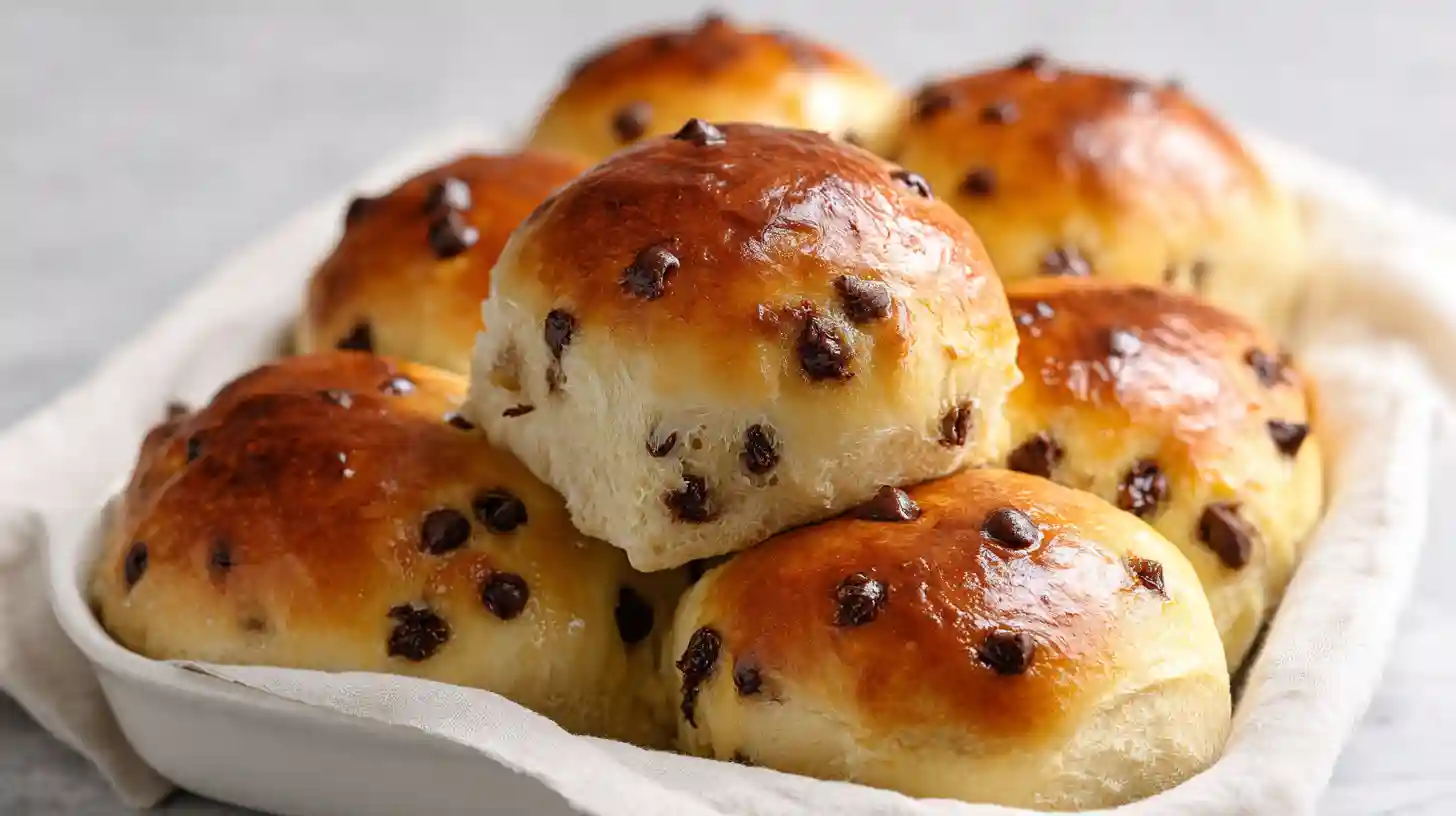
Soft bread dough made with milk and butter produces a completely different texture than standard white bread dough, and The Fluffiest Chocolate Chip Milk Buns are built entirely around that difference. The crumb is tender and pull-apart soft, the crust stays thin and delicate rather than chewy or tough, and the chocolate chips melt into small pockets throughout each bun during baking. They work as breakfast ideas chocolate fans will reach for first, and they hold up well through the afternoon as a sweet snack without tasting overly rich or heavy. The method is straightforward and uses one bowl for mixing the dough.
The one non-negotiable detail is giving the dough enough time to rise properly at both stages. Rushing either proof produces dense buns that don’t have the light, cottony interior the milk fat and enriched dough is capable of delivering.
Ingredients for The Fluffiest Chocolate Chip Milk Buns
- 3 cups all-purpose flour, plus extra for dusting
- 2.25 tsp active dry yeast, one standard packet
- 3 tbsp granulated sugar
- 1/2 tsp fine salt
- 3/4 cup whole milk, warmed to 110°F
- 1/4 cup warm water
- 3 tbsp unsalted butter, softened to room temperature
- 1 large egg, room temperature
- 3/4 cup semi-sweet chocolate chips
- 1 egg yolk mixed with 1 tbsp milk, for egg wash
How to Make The Fluffiest Chocolate Chip Milk Buns from Scratch
Warm the milk to 110°F before adding the yeast. Too cold and the yeast won’t activate. Too hot and it kills the yeast entirely. A kitchen thermometer takes the guesswork out of this, but if you don’t have one, the milk should feel comfortably warm on your wrist, similar to bathwater temperature, not hot. Let the yeast sit in the warm milk with a pinch of the sugar for 5 minutes until it becomes foamy on the surface. If it doesn’t foam, the yeast is not active and the batch needs to start over with fresh yeast.
- Combine flour, remaining sugar, and salt in a large bowl and whisk together. Make a well in the center. Pour in the foamy yeast mixture, warm water, egg, and softened butter. Mix until a shaggy dough forms, then turn out onto a lightly floured surface.
- Knead the dough for 8 to 10 minutes by hand until smooth, slightly tacky, and elastic. It should spring back when poked lightly with a finger. The dough will feel sticky at the start and smooth out as the gluten develops. Resist the urge to add too much flour during kneading since a slightly tacky dough produces a softer bun than a stiff one.
- Flatten the dough into a rough rectangle and scatter chocolate chips across the surface. Fold the dough over the chips and knead gently for 1 to 2 minutes until the chips are evenly distributed. Some chips will break slightly, which is fine and actually creates chocolate streaks through the finished crumb.
- Place the dough in a lightly oiled bowl, cover with plastic wrap or a clean kitchen towel, and let rise in a warm spot for 1 to 1.5 hours until doubled in size.
- Punch the risen dough down gently. Divide into 9 equal pieces, about 80 to 85 grams each if you have a scale. Shape each piece into a smooth ball by pulling the surface of the dough down and under, pinching the seam at the bottom. A tight surface tension on the ball produces a rounder, more evenly risen bun.
- Arrange balls in a greased 9-inch round cake pan or 9×9 square pan with the seams facing down. Leave a small gap between each since they will expand and touch during the second rise. Cover and let rise again for 45 to 60 minutes until puffed and the buns are touching each other lightly.
- Brush the tops gently with egg wash using a pastry brush, working carefully to avoid pressing the buns down. Bake at 350°F for 20 to 24 minutes until the tops are deep golden brown. Cool in the pan for 10 minutes before pulling apart to serve.
Shaping, Proofing, and Common Mistakes to Avoid
Uneven bun sizes cause uneven baking. The smaller buns finish before the larger ones and either the small ones overbake or the large ones stay underdone. Using a kitchen scale to divide the dough into equal portions solves this completely and takes about 2 minutes. If you don’t have a scale, divide the dough into a rough log first and cut it into equal sections by eye before shaping.
Overbaking is the most common way these morning recipes go wrong. The buns look pale at 18 minutes and can tempt you to leave them in longer, but once the tops reach a deep golden color the interior is fully set. Check at 20 minutes and pull them the moment the color is right. Residual heat in the pan continues cooking the base for several minutes after they come out of the oven.
Variations and Substitutions
Swapping semi-sweet chips for dark chocolate chips produces a more intense chocolate presence in each bun that pairs well with the subtle sweetness of the enriched dough. White chocolate chips or a mix of white and dark work for a sweeter, more dessert-adjacent result that fits well as sweet lunch ideas or a mid-afternoon snack alongside coffee. For easy breakfast ideas with cookies in mind, press a single chocolate sandwich cookie half into the top of each bun after the egg wash and before baking. It bakes into the dough and creates a visible cookie topping that adds a different crunch texture to the otherwise soft bun surface.
For bun recipes with a peanut butter angle, stir 2 tablespoons of creamy peanut butter into the softened butter before adding it to the dough. The peanut butter flavor is subtle rather than dominant but gives the crumb a slightly richer, nuttier background note that makes the chocolate chips taste more pronounced. This variation fits naturally as easy breakfast recipes with peanut butter that still feel like a treat rather than a compromise on flavor.
Storing and Keeping Buns Soft
Store buns at room temperature in an airtight container or sealed zip-lock bag for up to 3 days. The milk fat in the dough helps them stay soft longer than lean bread dough would, but they do begin to dry at the edges by day 3. Warming a day-old bun in the microwave for 15 seconds wrapped in a damp paper towel restores most of the original soft texture. For longer storage, freeze individual buns wrapped tightly in plastic wrap and placed in a freezer bag for up to 2 months. Thaw at room temperature for 1 hour or microwave from frozen for 30 to 40 seconds. Do not store in the refrigerator since cold air dries enriched dough faster than room temperature does and the buns go stale significantly faster that way.
FAQ
Can I use instant yeast instead of active dry yeast?
Yes. Instant yeast can be mixed directly into the dry ingredients without proofing in warm liquid first. Use the same 2.25 teaspoon quantity. The rise time with instant yeast is typically 15 to 20 percent shorter than with active dry, so check the dough at the 50-minute mark during the first rise rather than waiting the full hour. The finished buns taste identical regardless of which yeast type is used, but instant yeast is more forgiving and less sensitive to milk temperature since it doesn’t need to be activated in liquid before mixing into the dough for these chocolate chip milk buns.
Why didn’t my dough rise properly?
The most common cause is milk that was too hot and killed the yeast before it had a chance to activate. Anything above 120°F will damage active dry yeast. The second common cause is placing the dough to rise in a location that is too cold. Yeast activity slows significantly below 70°F. A reliable proofing spot at home is inside the oven with just the oven light turned on, which creates a consistently warm environment around 75 to 80°F without any actual heat. If your yeast didn’t foam during the initial activation step, that is the clearest signal to start with a fresh packet rather than proceeding with a batch that won’t rise.
Can I add cinnamon to the dough for a different flavor?
Yes, and it works well. Add 1 teaspoon of ground cinnamon to the dry flour mixture before combining with the wet ingredients. The cinnamon distributes evenly through the dough and gives the finished buns a warm spice note that complements the chocolate chips without competing with them. For healthy breakfast ideas with cinnamon rolls as inspiration, brush the baked buns with a thin glaze made from 1/2 cup powdered sugar and 1 tablespoon of milk while they are still slightly warm. The glaze sets quickly and adds a faint sweetness that ties the cinnamon and chocolate together into something that reads more like a cinnamon roll hybrid than a plain milk bun.
Can I make the dough the night before?
Yes. After the first rise, punch the dough down, shape the balls, and arrange them in the pan. Cover the pan tightly with plastic wrap and refrigerate overnight for up to 16 hours instead of doing the second proof at room temperature. The cold temperature slows the yeast but doesn’t stop it entirely, so the dough rises slowly in the fridge overnight. The next morning, pull the pan from the refrigerator and let it sit at room temperature for 45 to 60 minutes before baking. This approach makes the fluffiest chocolate chip milk buns very practical as easy breakfast ideas with minimal morning prep needed beyond preheating the oven.
Can I make these without a stand mixer?
Completely. The recipe above is written entirely for hand mixing and hand kneading. A stand mixer with a dough hook makes the process faster, about 6 minutes of kneading on medium speed rather than 8 to 10 minutes by hand, but the finished texture and rise of the dough are comparable either way. If using a stand mixer, add the chocolate chips in the last minute of kneading rather than folding them in by hand. Watch the dough closely in the final minutes of machine kneading since over-kneading in a mixer can tighten the gluten structure and produce a slightly chewier crumb than the hand-kneaded version of these bun recipes.
The Fluffiest Chocolate Chip Milk Buns
Ingredients
Equipment
Method
- Proof yeast in warm milk with a pinch of sugar for 5 minutes until foamy. If it doesn’t foam, start with fresh yeast.
- Mix flour, remaining sugar, and salt. Add yeast mixture, warm water, egg, and butter. Mix until a shaggy dough forms, then knead 8 to 10 minutes until smooth and elastic.
- Fold in chocolate chips by flattening the dough, scattering chips across the surface, folding, and kneading gently 1 to 2 minutes.
- Rise covered in an oiled bowl in a warm spot for 1 to 1.5 hours until doubled.
- Divide into 9 equal pieces, shape into tight balls, and arrange in a greased pan with small gaps between each. Cover and let rise 45 to 60 minutes until puffy and touching.
- Brush tops gently with egg wash. Bake at 350°F for 20 to 24 minutes until deep golden brown. Cool 10 minutes in the pan before serving.
Notes
- Milk must be 110°F to activate yeast – too hot kills it, too cold won’t activate it.
- Do not add too much flour during kneading – a slightly tacky dough produces softer buns than a stiff one.
- Use a kitchen scale to divide dough into equal portions for evenly sized buns that bake at the same rate.
- Pull buns from the oven as soon as tops are deep golden – residual heat in the pan continues cooking the base after removal.
- For overnight prep, refrigerate shaped unbaked buns after the first rise and let them come to room temperature 45 to 60 minutes before baking.